Finally a baby stamps set that I love!! This one is from Papertrey Ink and it's called Bitty Baby Blessings. I colored the onesie with copics, and layered it on a Chocolate Chip scalloped rectangle which I embossed with the Swiss Dots CB folder. The background is Pink Pirouette with Chocolate Chip polka dots, and this was stitched to the card base. The sentiment is framed with the Scallop Circle Punch from SU, hung as a tag and left loose to move around, and the ribbons tie it altogether. I also added a bit of Liquid Applique to the bunny's tail and silver metalic dots for snaps on the onesie.
Wednesday, December 31, 2008
Tuesday, December 30, 2008
Kindness Flourishes
I love doing monochromatic cards, they always seem so classy! This one is all white and Baja Breeze (SU). I tried a new technique that I found on Nichole Heady's blog using polyshrink to make matching *buttons* for projects. I first used the background stamp on the polyshrink, and it turned out to be really fun! Then I layered it and tied the ribbon through it. The butterfly and sentiment are popped up and I added a few tiny rhinestones for a little sparkle. Then I stitched the background onto another layer of solid Baja Breeze cardstock to frame everything. What a great idea to make buttons...no more trying to find the perfect color, just stamp, punch and bake!
Monday, December 29, 2008
Chair & Lamp Welcome
This is a fun image from A-Muse Art Stamps! I colored it with Copics and then framed it adding the navy blue scallops and some ribbon to make the pale blue and green colors look more vibrant! The background is embossed, first stamped with white Craft Ink and then I used white embossing powder. I puched the word window out of the bottom and stamped the *Welcome* sentiment on the card base. I added the ribbons and then popped the base up on foam dots. A white Prima hydrangea with blue dew drop center finish off this cheery card.
Saturday, December 27, 2008
Simple Baby Bunny
Today I decided to share a very simple card that could be done in about 10 minutes. The bunny stamp is from CTMH, and the word stamp is from Stampin' Up!. I chose a background paper that I love from Crate Paper, and then just pulled ink colors from it for the bunny and the sentiment. The image was cut with the new Labels 1 Nestabilities, as well as a mat in a solid color. The image was popped up from the mat with foam mounting tape and then a gingham ribbon tied through it. The white flower with dew drop add a little dimension. I love the soft simplicity of this card!
Monday, December 22, 2008
Thank You Teacher
Just talked to my daughter's music teacher and found that she actually made the the school Christmas program NON-Christmas so that all of the kids who don't celebrate (mine is one of them) are able to take part in it this year! I just had to make her something special to show a little of my appreciation for her extra hard work! So this is it! The stamps are from a Papertrey Ink set called Teacher's Apple. I stamped them in rustic red and cocoa brown and then stitched matching frames for the two images. The background paper is Basic Grey Boxer DP, and that is also stitched to the base. Some twill ribbon and a couple of dew drops dress it up but still keep the simple elegance of the card. Hopefully she will like it!
Sunday, December 21, 2008
Copper Cowboy
Bronc Buster is one of my favorite Stampin' Up! sets, though I really don't use it very often, so I thought I would pull it out today. I heat-embossed the main image and some stars with Copper Embossing Powder and then distressed everything with tan ink. The background paper is SU's Outlaw Designer Paper and the colors seemed to work perfectly with the copper. I added a chocolate crocheted trim and used copper wire to 'hang' the stars from it, as well as wrapped some of the same wire around the cowboy image. This is a rich-looking rustic card that is actually really simple to do!
Saturday, December 20, 2008
Farm Girl & Chicks
These stamps are all from a set called Punny Farm from My Favorite Things. The images are fairly large, so I went with a 5 1/4" square card base on this one. I stamped the chicks around the girl's feet and then colored everything with colors in the paper I used for the background. I added Distress Stickles to the chicks and the hat to give them some texture, and decided we needed another little chick popped up in front of the girl's boots. I used Glossy Accents in the buckets to make it look like they are full of water. The image was cut out with a Labels 1 Nestabilities die, and the sentiment was punched with the Key Tag punch from Stampin' Up!. I stitched the background paper onto the base and added the Prima Flowers and then a red Dew Drop to match the ribbons. Overall it's a cheery farm-girl card with a little class!
Thursday, December 18, 2008
Time Well Spent
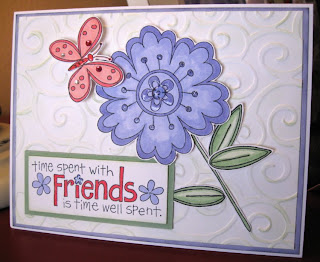
The title of this card is fitting in more ways than one. This card looks fairly simple, however there was a lot of time spent in coloring and cutting out the images...but it was time well spent! All of these stamps are from a Stampin' Up! set called Time Well Spent. The flower and butterfly were colored with Copic markers and then I added Glossy Accents (Ranger) to give them some dimension. The butterfly has rhinestones on it's wings and both images are layered with foam tape to appear 3-D. The background was dry-embossed with a Cuttlebug folder and slightly inked with pale green. The sentiment was colored with the same inks and the images and backed in green. It's a fresh summer-y cheery card and it was fun to spend some winter-time doing it!
Wednesday, December 17, 2008
Bee Happy by Mara
And here is another card to share with you today. This one is called Bee Happy by my 7 year old daughter Mara. She used a Stampendous stamp called Bee Buddies, and colored them with Bic Markits. They were cut out with a Pinking Nestabilities Die, and placed on a yellow textured cardstock base. Then she added a Quickutz Cosmopolitan die-cut letter B in red to match one of her bees, and hand-wrote 'Happy.' She said it was less work that way instead of cutting out more letters. :) I think it turned out perfect! It's easy to be happy when I look at this!!
Snowboard Loser
I am rarely serious, so humorous cards are so fun for me! This one just makes me laugh...and it was very easy! The image stamp is from Stampendous, and the crazy cat is called Fluffles. He was colored with Copic marker colors pulled from the Cosmo Cricket background paper. (Cogsmo line) The sentiment is from Stampin' Up!'s Smarty Pants set, and it seemed to go so well with this funny little snowboarder. A ribbon and matching punched snowflake finish it all off!
Shivering Monkey
This cute little monkey is called Changito Cocoa from Stampendous. I did this color combination for a challenge on SCS, and ended up liking how it turned out. The white snowflakes on the background and the 'brrr...' sentiment are embossed in white. The stitching and silver cord on the punched snowflake add a lot of texture. The monkey was colored with Copic markers using the three colors in the challenge: Baja Breeze, Teal and Red and then framed in the color of the mug. I also added a little Liquid Applique to the boots, mittens and pompom on the hat to make them pop. This little shivering monkey was a fun project!
Wednesday, December 10, 2008
Baby Duck Bath
This little duck from Whipper Snapper is so cute in his little washtub! I colored him with Copics and then added dew drops to some of the bubbles. Then I framed him using nestabilities in blue scallops and added white dots to make them stand out. The dotted theme was continued on the yellow background which is stitched to the card base. A white button and blue gingham ribbon tie it all together. This simple layout shows off the image perfectly!
Tuesday, December 9, 2008
Rain Dots
Another set from My Favorite Things that I had to try out! This one is called Rain or Shine, and I just love those dotted boots, so I added dots with a Millenium Pen (looks like the ink on the stamp) to the raincoat and colored it to match the boots with soft cocoa and celery green Copics. I stitched the frame and the edge of the background paper (Crate Paper) to give it come texture. I added a layer of stickles to the puddle to give it a real watery look, tied a ribbon in a bow, and then centered the flowers with Dew Drops to carry on the dotted theme. It turned out to be a cheerful card to perk up someone special!
Monday, December 8, 2008
Warm Flopsey the Bunny
This adorable Snowbunny Flopsey stamp set came today from My Favorite Things. I think it is quickly becoming one of my favorite stamps, that's for sure! I went crazy with the sewing machine and stitched everything together, and followed that up with a lot of distressing. Flopsey was colored with Copic colors pulled from the Cosmo Cricket background paper. I stamped an old library card image (Stampin' Up!) and distressed that before adding the sentiment in a dark red to match the frame and stitched ribbon. I added some liquid applique to make Flopsey's hat and mittens pop, and then a punched snowflake was anchored with a copper brad that matches the photo clip on the sentiment. Overall it turned out to be a very *warm* card.
Sunday, December 7, 2008
Riley's Good Life
Another fun image of Riley by Hanna Stamps. I actually enjoy doing laundry, so this one is a must have...of course I use a dryer instead of antlers! I colored the image with Copic Markers that pulled the colors from the papers, and then used Nestabilities to cut it out and frame it in scallops. I distressed the edges of the white paper and I added the dots to the scallops with a white gel pen to make them stand out. The papers are from Cosmo Cricket, and the ribbon adds a lot of texture. I scalloped the bottom of the striped paper to coordinate with the image frame, and then punched flowers from matching papers and added Dew Drop centers to show them off. Life is good...even when you are doing laundry!
Saturday, December 6, 2008
Riley's Favorite Coffee
I finally bought some Riley the Moose...from Hanna Stamps. They came earlier this week, and I finally got a chance to ink one up! This image is called Coffee Riley, and this card hits close to home with a bunch of favorites of mine; I love moose, red, blue, copper, and especially coffee! I colored Riley with Copics, then framed him in colors from the Cosmo Cricket (my favorite!!) background paper. I stitched the paper onto a red base to make it pop, and then tied it all together with a bunch of ribbon knots. The sentiment is from Stampin' Up!'s Define Your Life set...it gives the definitions of words, and I just punched out the part that seemed to fit the image. I framed it in copper Hodgepodge. I hope you enjoy Riley in his comfy chair sipping his favorite coffee with a cupcake!
Friday, December 5, 2008
Dazzling Snowman
This isn't my latest project, but it is by far one of my favorites. I love red, expecially deep dark rustic red, and I love snowmen...so what could be more fun than this?? The images are Papertrey Ink's Made From Snow set. I stamped the snowman, colored him, and cut him out. Then I covered him in Dazzling Diamonds. I then stamped the hat and scarf on scraps of the background paper, and cut them out. The sentiment is cut, embossed and framed in red scallops with a slightly distressed edge. Cranberry and Silver Ribbons tie the card together, with a few snowflakes punched from the background paper added with glazed brads to balance out the bottom left corner. Then I stamped the envelope with cranberry ink to coordinate with the whole card!
My First Post!!
Ok...so I decided to go ahead and start a blog...why not? Everyone else is doing it...haha! So this is going to be my spot to share with you some of my favorite projects, and how you can do them too! Again...I am new at this, so it may be a while before there is anything fun about this blog!
Subscribe to:
Posts (Atom)